
1. Introduction
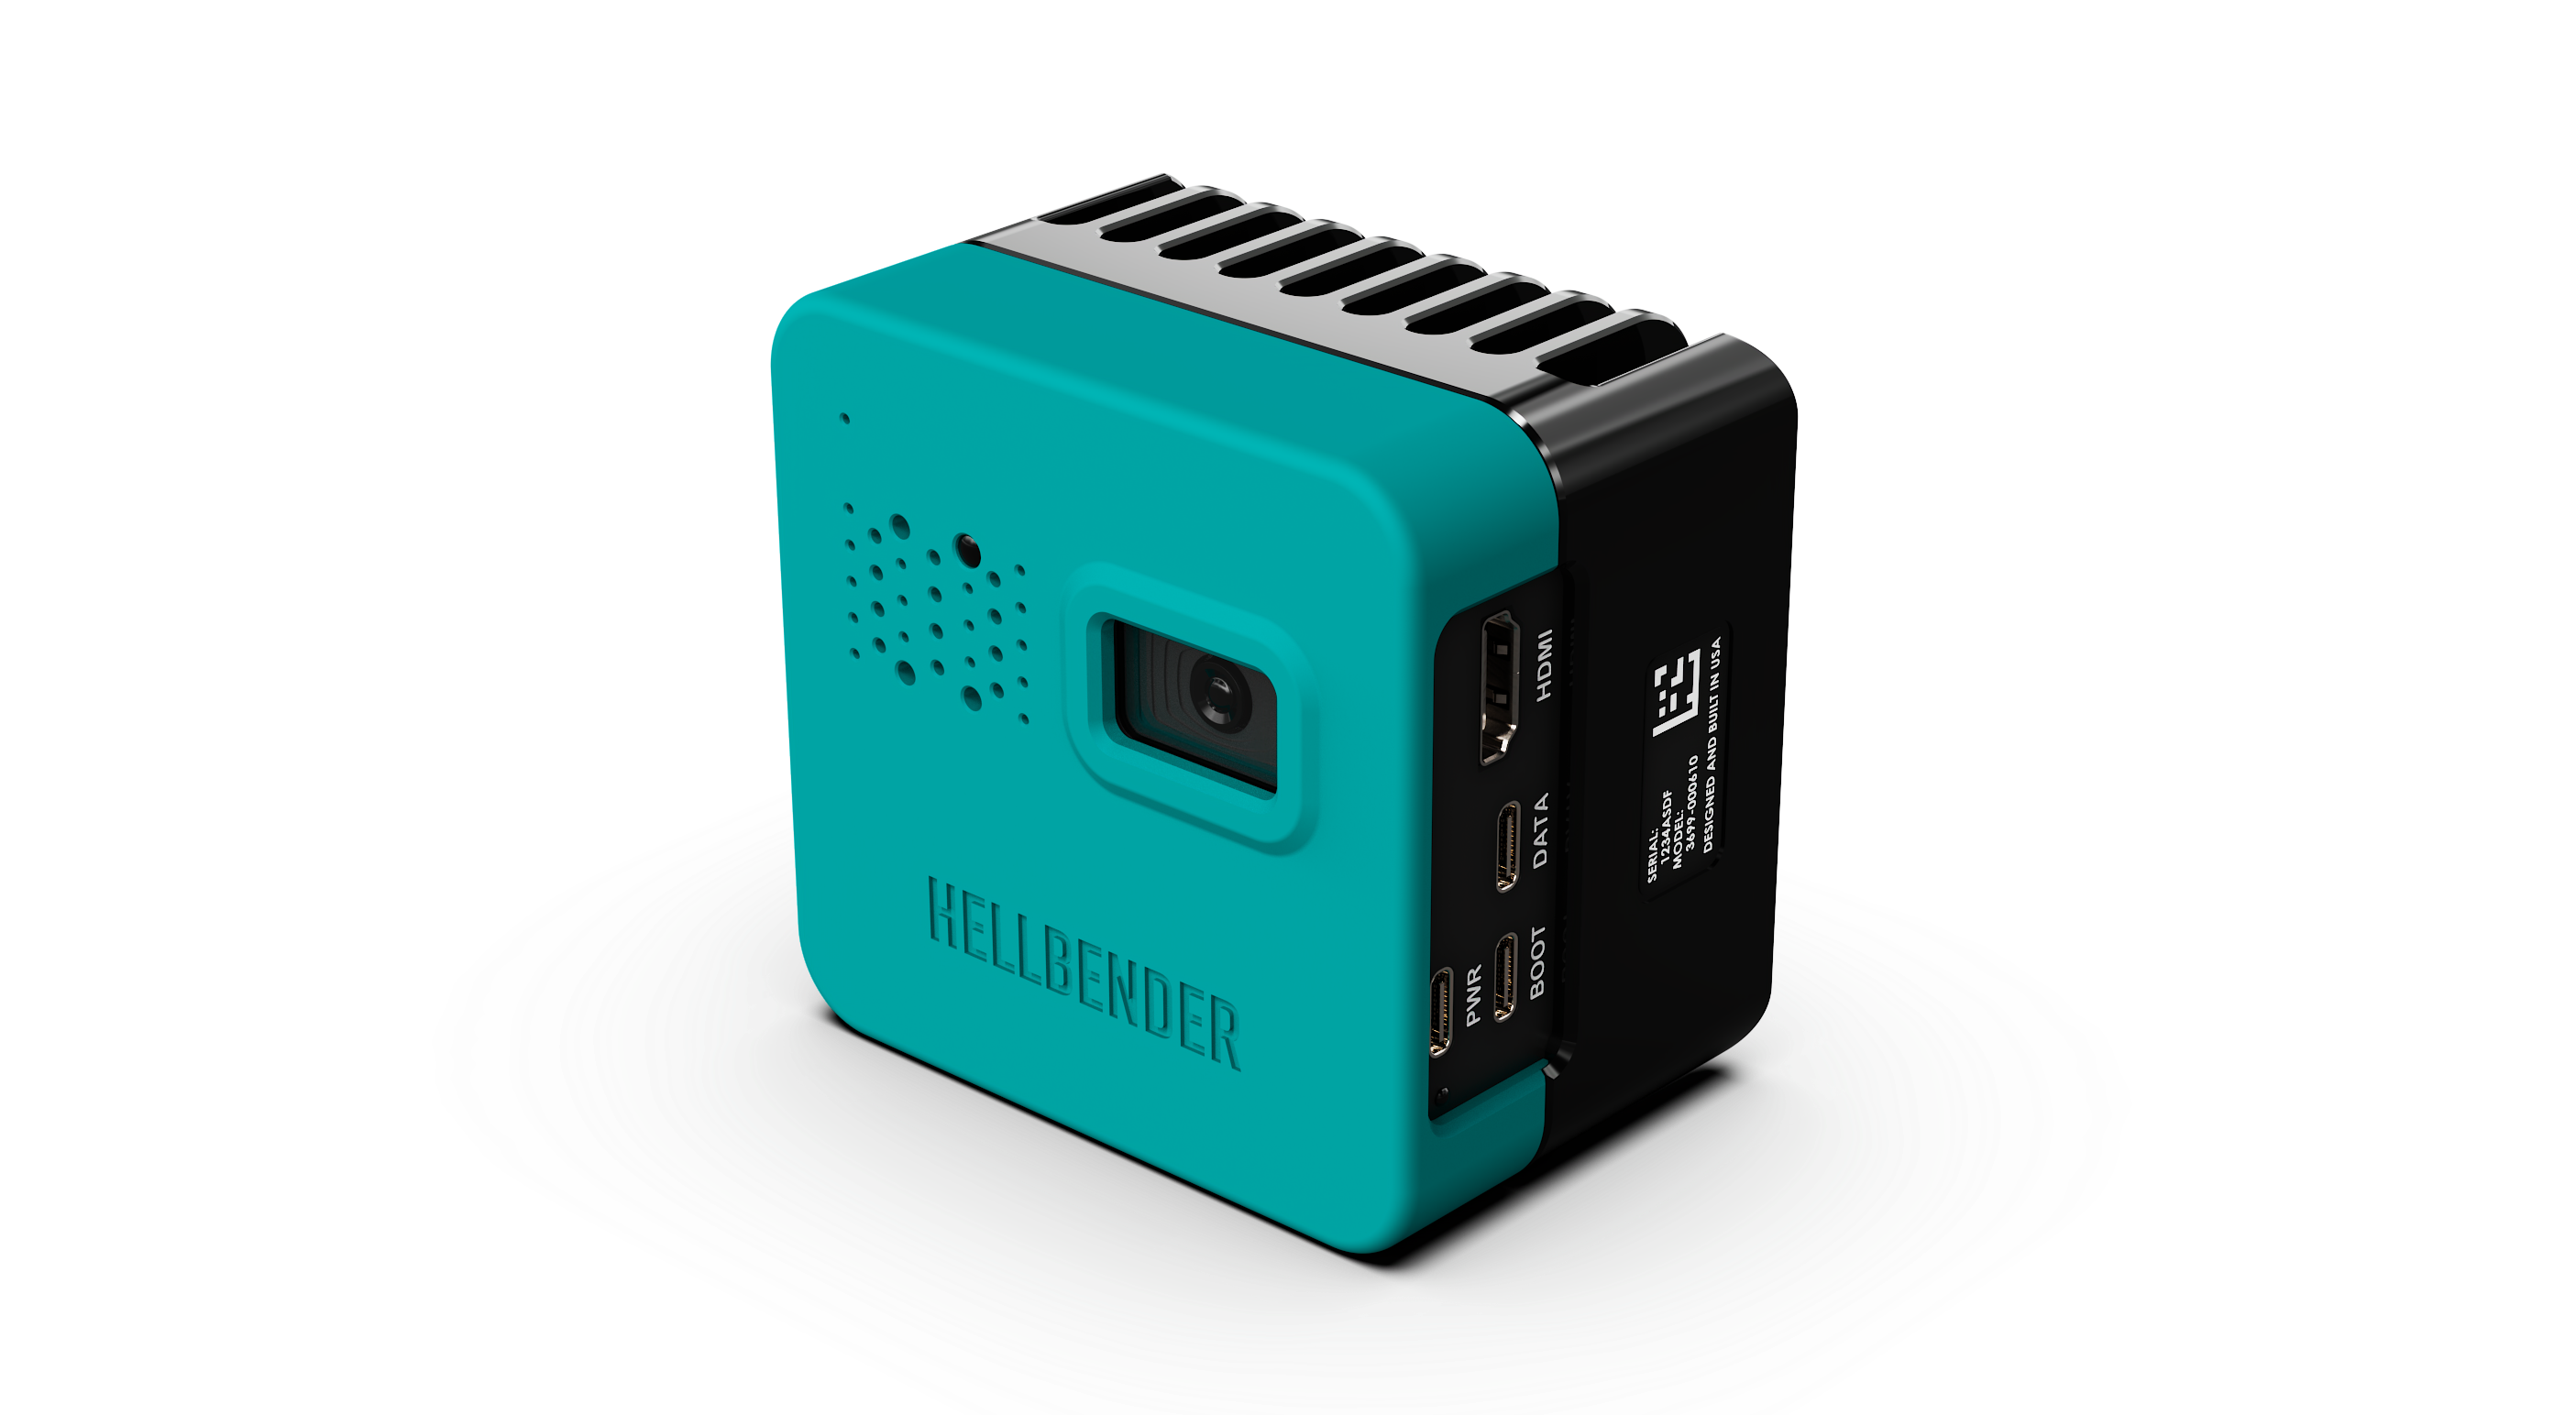
The Hellbender Tendryl Camera is a fully programmable, all-in-one edge AI camera combining a Raspberry Pi CM5 and Hailo-8 AI accelerator. It is capable of empowering advanced computer vision applications, and bridges the gap from benchtop prototype to deployed product.
Key features include:
-
Gigabit Power over Ethernet (PoE), 3 USB-C ports, and HDMI
-
User programmable quad core ARM Cortex-A76 processor with Raspberry Pi OS
-
Hailo-8 accelerator with 26 TOPS
-
On-board IMU, environmental sensor, and microphone
-
Integrated speaker and programmable RGB LED
This device was engineered and built in Pittsburgh, PA.
1.1. Specifications
Dimensions |
680 g |
Power |
PoE+ > 15W |
Compute |
Raspberry Pi CM5 Quad Core Cortex-A76 @ 2.4GHz (4GB RAM, 16GB eMMC) |
Electrical Interface |
RJ45 Gigabit PoE+ |
Mechanical Interface |
2x 1/4-20 Mounting Points + Anti-Rotation Pinholes - 1 rear, 1 bottom |
Wireless Network |
2.4 GHz and 5.0 GHz IEEE 802.11 b/g/n/ac Wi-Fi |
Optical |
11.9 MP Autofocus Camera |
Sensors |
6-axis IMU |
Signal Outputs |
Programmable RGB LED |
Environment |
Recommended operating temperature -5°C to 35°C |
2. Quick Start
2.1. What’s in the Box
The Hellbender Tendryl Camera comes with the following items:
-
Hellbender Tendryl Camera
-
27W USB-PD Adapter
To connect to the Tendryl Camera, you’ll need to supply cables to support one of the connection methods below.
2.2. System Setup
There are several ways to work on the Tendryl Camera:
-
USB-PD & Standard Ethernet: With the power adapter connected to the PWR port, use a standard Ethernet cable to provide the data connection between a host computer and the Tendryl Camera.
-
USB-PD, USB-DATA, & HDMI: With the power adapter connected to the PWR port, use the HDMI port to connect to a display, and connect a mouse and keyboard to the DATA USB-C port. In this setup, the Tendryl Camera acts as its own host.
-
PoE+: Use a single connection to the Tendryl for both power and data by connecting via a PoE+ injector or PoE+ switch.
-
USB-PD, USB-DATA: Power the Tendryl using USB-PD (PWR) and connect the DATA USB-C to a host. Note: The USB-DATA port does not have a static IP but can accept a DHCP address and be configured using standard Linux networking tools. For a simple static IP address, connect via option #1 or #3.
2.3. Connect
The Hellbender Tendryl Camera has a static IP address of 192.168.72.98. To establish a direct connection, configure your computer’s network interface to a unique IP address on the same subnet (e.g., 192.168.72.100) with a subnet mask of 255.255.255.0.
On Mac: Navigate to System Settings > Network > Ethernet (USB 10/100/1000 LAN) > Details… > TCP/IP, and use the dropdown next to 'Configure IPv4' to select 'Manually' and enter the IP address and subnet mask above.
On PC: Navigate to Settings > Network & internet > Ethernet, and click the edit button next to 'IP assignment.' Change the dropdown to Manual and toggle on IPv4 before entering the information above.
To confirm a connection, open a terminal and enter ping 192.168.72.98. You should see responses similar to those shown below:
HOST ~ % ping 192.168.72.98
PING 192.168.72.98 (192.168.72.98): 56 data bytes
64 bytes from 192.168.72.98: icmp_seq=0 ttl=64 time=1.855 ms
64 bytes from 192.168.72.98: icmp_seq=1 ttl=64 time=1.951 ms
64 bytes from 192.168.72.98: icmp_seq=2 ttl=64 time=1.180 ms
64 bytes from 192.168.72.98: icmp_seq=3 ttl=64 time=1.735 ms
2.4. Log In
Once connected to the Tendryl Camera, log in through the user interface or via SSH as shown below. For both access methods, the username will be hellbender and the password can be found on the label inside the original box.
ssh hellbender@192.168.72.982.5. Run Inference
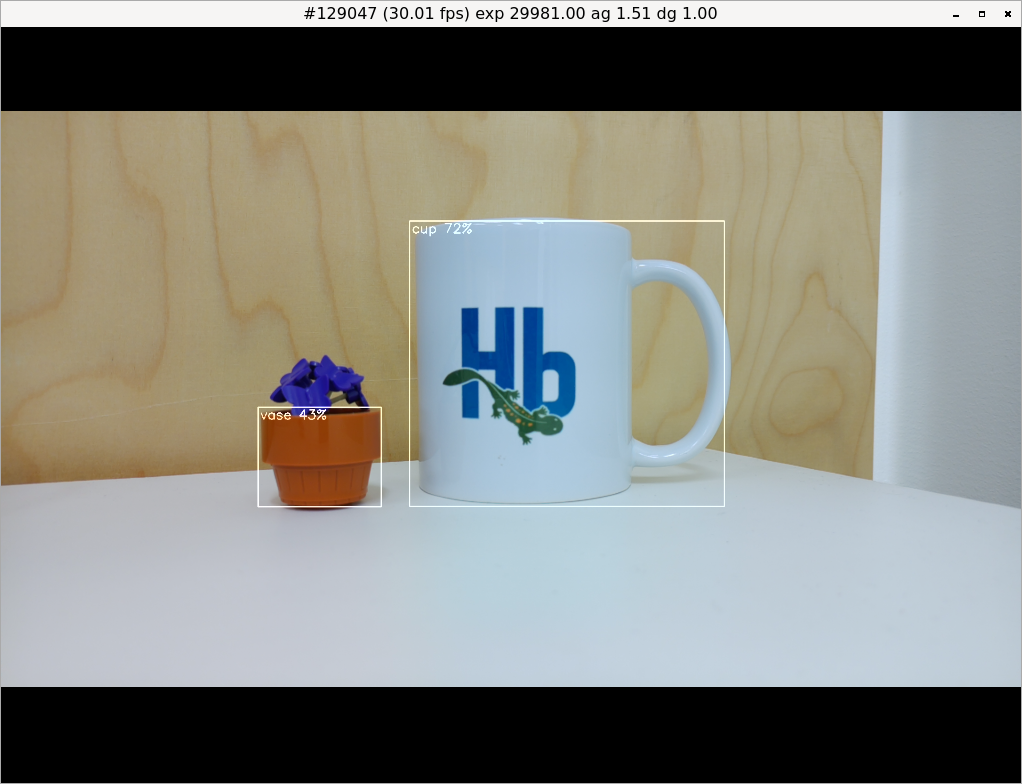
The easiest way to run inference on the Tendryl Camera’s output is to connect it to a monitor via HDMI and a mouse and keyboard via the USB Data port. Once connected to the Tendryl Camera, run the command below or any of the commands found in Raspberry Pi’s AI software documentation.
rpicam-hello -t 0 --post-process-file /usr/share/rpi-camera-assets/hailo_yolov6_inference.jsonThis launches a video feed using the rpicam library, and processes the stream via the Hailo-8. You should see a video pop up that detects common objects, as shown below:
3. Hardware
3.1. Features & Dimensions
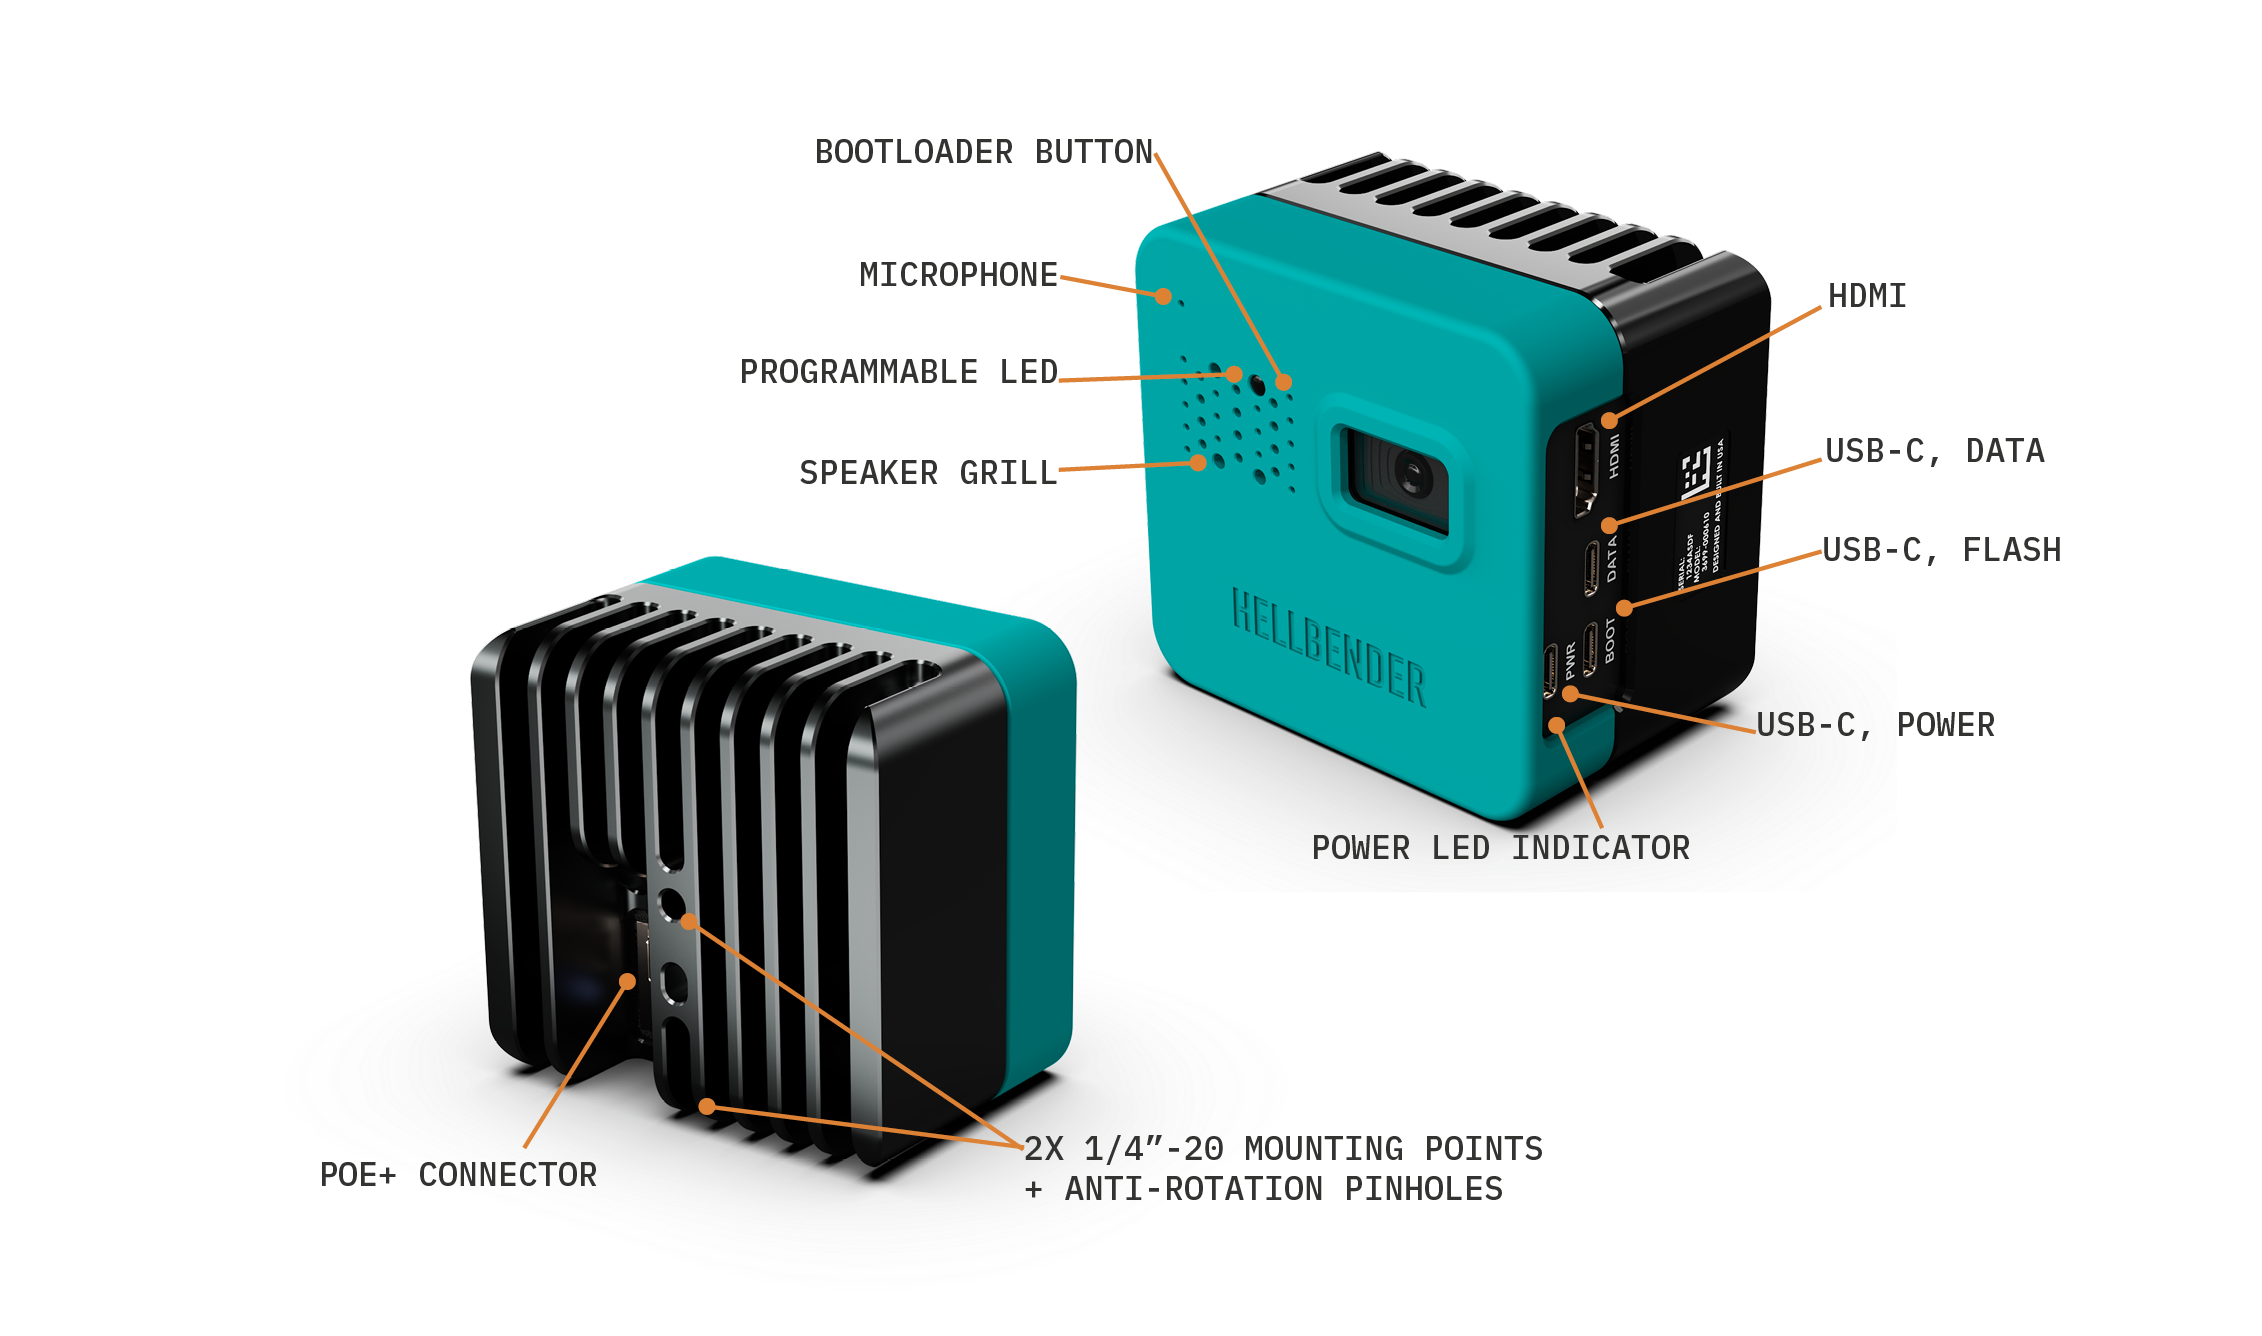
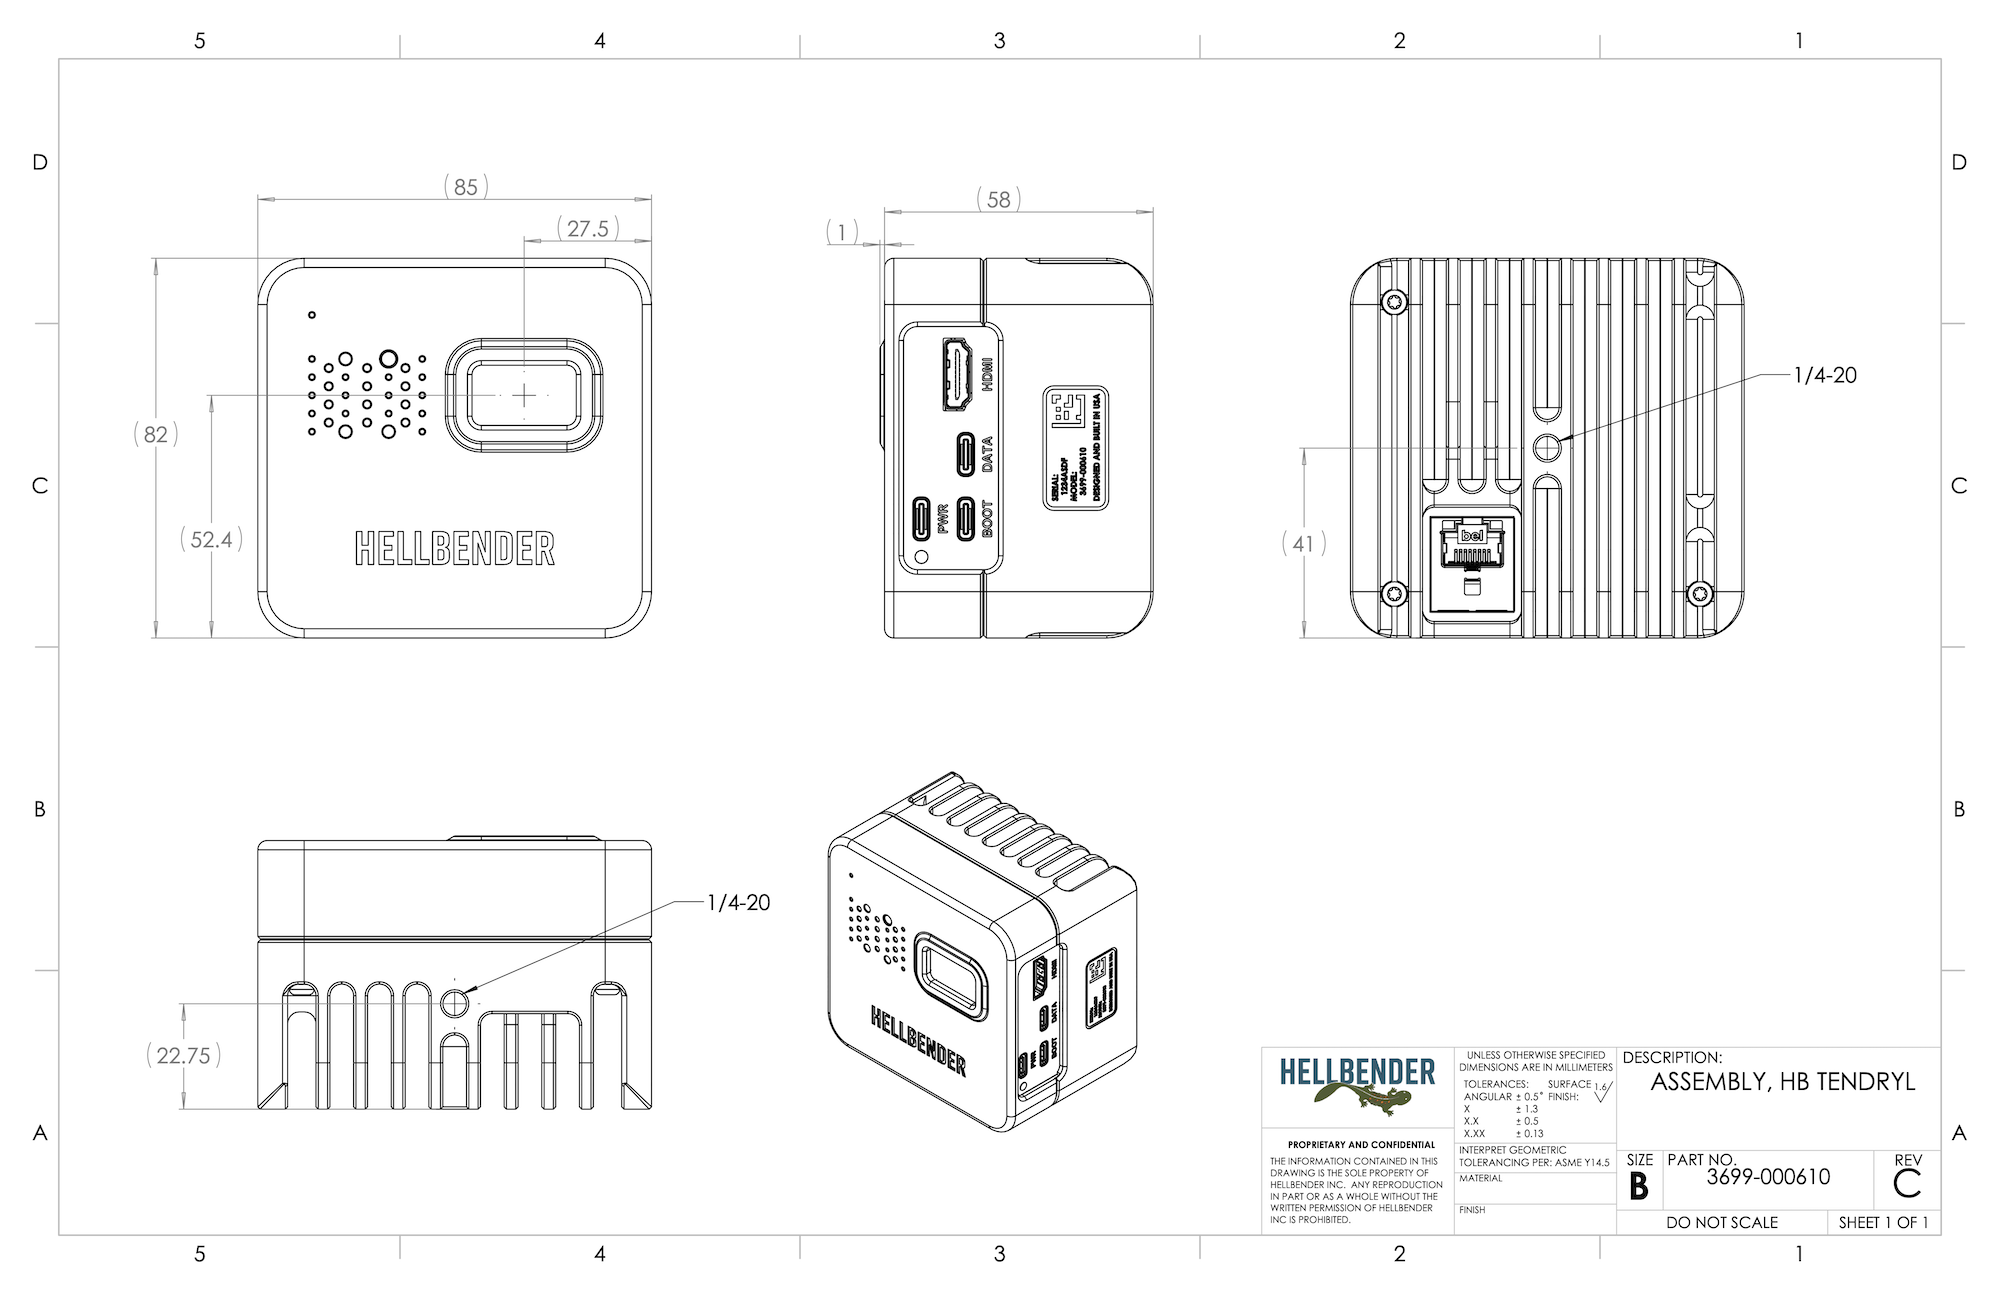
The Hellbender Tendryl Camera comes in standard and wide FOV variants; though the variants have different fields of view, all dimensions are the same. See the diagrams below to view the external features and dimensions of the Tendryl Camera:
3.2. Connectors
The Hellbender Tendryl Camera provides many connection points for versatility and ease of integration. See more detailed specifications below:
| Connector Name | Specifications |
|---|---|
PoE+ |
RJ45 for PoE+ OR standard Ethernet |
Power USB |
USB Power Delivery (PD) |
Data USB |
USB-C 3.0 |
Boot USB |
USB-C 2.0 |
HDMI |
HDMI |
3.3. Power
The Hellbender Tendryl Camera can be powered two ways: via USB-PD or PoE+. If both USB-PD and PoE+ are plugged in, the device will default to PoE+. A USB-PD adapter must be able to provide a minimum of 1.5 A at 12 V or greater, and while PoE may power the Tendryl Camera in most scenarios, PoE+ provides sufficient power at maximum power draw.
3.4. Mounting
The Hellbender Tendryl Camera has two mounting points with anti-rotation pinholes on the bottom and rear faces of the heatsink. Each mount point provides a standard 1/4-20 hole that is 14mm from a 4.8mm x 6.8mm anti-rotation pinhole.
Mount the Tendryl Camera without constricting airflow around the heatsink to enable optimal cooling and performance.
4. Software
The Hellbender Tendryl Camera runs Raspberry Pi OS, altered only to incorporate all of its integrated peripherals. Documentation that applies to Raspberry Pi OS should also apply to the Hellbender Tendryl Camera.
4.1. Software Updates
To update the Tendryl’s software, follow the steps below:
-
Begin with the Tendryl completely off, with no power applied.
-
Download the Tendryl image you wish to flash from the Hellbender Tendryl Camera GitHub Repository.
-
Connect your host computer to the Tendryl’s "BOOT" port via USB cable.
-
Use a long and narrow tool like a paper clip or needle to press and hold the boot button behind the upper right hole in the speaker grill.
-
Connect the Tendryl to power and wait to release the boot button until 3 seconds after the power LED turns on.
-
Follow Raspberry Pi’s Imager instructions to install a custom image onto the Tendryl. Once the Imager launches, select 'Raspberry Pi 5' on the first screen, then 'OS' and 'Use Custom' at the bottom of the second. Finally, select Tendryl as the Storage Device and begin the flashing process.
4.2. Device Interfaces
4.2.1. LED Control
The Hellbender Tendryl Camera integrates a programmable RGB LED into the front speaker grill. Below are the usage guidelines, which can be accessed by entering the command lp5810-rgb -h in the command line:
hellbender@hb-tendryl:~$ lp5810-rgb -h
Usage: lp5810-rgb [OPTIONS] <RED> <GREEN> <BLUE>

Arguments:
<RED>    Red channel PWM value
<GREEN>  Green channel PWM value
<BLUE>   Blue channel PWM value

Options:
  -i, --i2cdev <I2CDEV>    Path to linux i2cdev [default: /dev/i2c-1]
  -a, --address <ADDRESS>  Led driver address, hardware defined by chip part number [default: D]
  -s, --skip-init          Skip driver config and only send new RGB value
  -h, --help               Print help
  -V, --version            Print version
See below for usage examples:
// Check driver version
hellbender@hb-tendryl:~$ lp5810-rgb -V
lp5810-rgb 0.1.0

// set the LED to red
hellbender@hb-tendryl:~$ lp5810-rgb 255 0 0

// set the LED to yellow
hellbender@hb-tendryl:~$ lp5810-rgb 255 255 0

// set the LED to white
hellbender@hb-tendryl:~$ lp5810-rgb 255 255 255
4.2.2. Get IMU Data
The IMU shows up as multiple devices under the IIO subsystem. The acceleration data shows up on one device and the gyro data is on a second device. Use the following commands to read data from the IMU.
# cat /sys/bus/iio/devices/iio\:device2/name
iim42652-accel
# cat /sys/bus/iio/devices/iio\:device2/in_accel_z_raw
2136
# cat /sys/bus/iio/devices/iio\:device2/in_accel_x_raw
116
# cat /sys/bus/iio/devices/iio\:device2/in_accel_y_raw
15
Available IMU Data
The following shows the full list of data available from the accelerometer.
hb-tendryl:~$ ls /sys/bus/iio/devices/iio\:device2/
buffer/                       in_temp_offset
buffer0/                      in_temp_raw
current_timestamp_clock       in_temp_scale
dev                           mount_matrix
in_accel_calibbias_available  name
in_accel_scale                of_node/
in_accel_scale_available      power/
in_accel_x_calibbias          sampling_frequency
in_accel_x_raw                sampling_frequency_available
in_accel_y_calibbias          scan_elements/
in_accel_y_raw                subsystem/
in_accel_z_calibbias          uevent
in_accel_z_raw
To read the Gyro data read from the other device. The following shows the available info from the gyro.
hb-tendryl:~$ ls /sys/bus/iio/devices/iio\:device1/
buffer                          in_temp_offset
buffer0                         in_temp_raw
current_timestamp_clock         in_temp_scale
dev                             mount_matrix
in_anglvel_calibbias_available  name
in_anglvel_scale                of_node
in_anglvel_scale_available      power
in_anglvel_x_calibbias          sampling_frequency
in_anglvel_x_raw                sampling_frequency_available
in_anglvel_y_calibbias          scan_elements
in_anglvel_y_raw                subsystem
in_anglvel_z_calibbias          uevent
in_anglvel_z_raw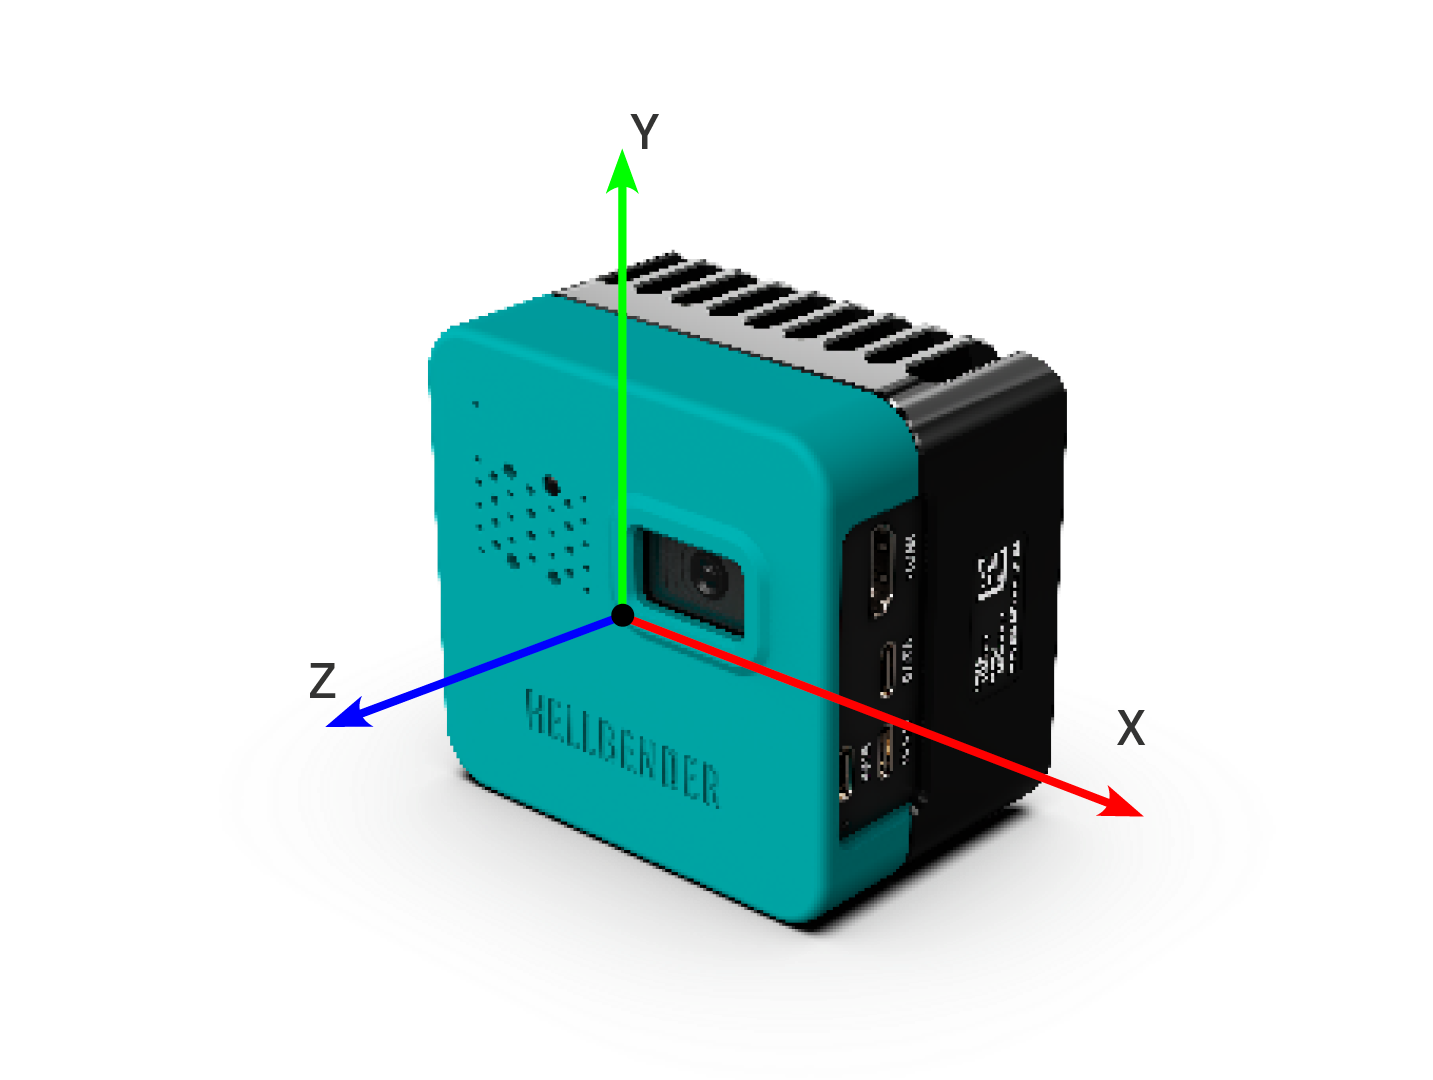
4.2.3. Get Environmental Data
To get a list of available data from the sensor, run the following command:
// See available data
hb-tendryl:~$ ls /sys/bus/iio/devices/iio\:device0/
in_humidityrelative_input
in_humidityrelative_oversampling_ratio
in_pressure_input
in_pressure_oversampling_ratio
in_temp_input
in_temp_oversampling_ratio
name
of_node/
power/
subsystem/
uevent
Read values from the iio subsystem:
# cat /sys/bus/iio/devices/iio\:device0/name
bme280
# cat /sys/bus/iio/devices/iio\:device0/in_pressure_input
97.335871093
# cat /sys/bus/iio/devices/iio\:device0/in_temp_input
38870
# cat /sys/bus/iio/devices/iio\:device0/in_humidityrelative_input
32355
Temperature is reported in milli-degC.
28870 → 28.870C → 83.97 FHumidity is reported as value to be divided by 1024.
32355/1024 → 31.6% RHPressure is reported in kPa.
4.2.4. Get Microphone Data
The Hellbender Tendryl Camera has a microphone that can listen to its environment through a hole in the rear heatsink. It uses the arecord command to record audio, as shown below:
// Get usage guidelines
arecord -h

// Record from mic_sv (microphone name) for 5 seconds in signed 32 bit little endian sample format at 48 kHz sample rate
arecord -D mic_sv -d 5 -f S32_LE -r 48000 -c 2 -vv test_record.wav
4.2.5. Speaker Control
The Hellbender Tendryl Camera has a front-facing speaker that can be controlled with the commands below:
// enable audio amplifier
hellbender@hb-tendryl:~$ pinctrl 24 op dh

// play audio file
aplay -Dhw:2,1 audio_file_name.wav

// disable audio amplifier
hellbender@hb-tendryl:~$ pinctrl 24 op dl
4.3. Running Models
To get started running vision models on the Tendryl Camera, see Raspberry Pi’s Vision AI documentation. To explore publicly available Hailo models to run on the Hailo-8, see Hailo’s GitHub, model explorer, and model zoo pages.
5. Support
For help with any issues or technical questions not addressed in the documentation, please contact Hellbender Support at support@hellbender.com.
6. Changelog
This section includes a high level change description for this document.
| Version | Release Date | Description |
|---|---|---|
1.0 |
May 2026 |
First release of Tendryl Camera documentation |
2.0 |
August 2026 |
Initial public release of Tendryl Camera documentation |
7. Disclaimers
TECHNICAL AND RELIABILITY DATA FOR HELLBENDER PRODUCTS (INCLUDING DATASHEETS OR SCHEMATICS) AS MODIFIED FROM TIME TO TIME ("RESOURCES") ARE PROVIDED BY HELLBENDER INC ("HB") "AS IS" AND ANY EXPRESS OR IMPLIED WARRANTIES, INCLUDING, BUT NOT LIMITED TO, THE IMPLIED WARRANTIES OF MERCHANTABILITY AND FITNESS FOR A PARTICULAR PURPOSE ARE DISCLAIMED. TO THE MAXIMUM EXTENT PERMITTED BY APPLICABLE LAW IN NO EVENT SHALL HB BE LIABLE FOR ANY DIRECT, INDIRECT, INCIDENTAL, SPECIAL, EXEMPLARY, OR CONSEQUENTIAL DAMAGES (INCLUDING, BUT NOT LIMITED TO, PROCUREMENT OF SUBSTITUTE GOODS OR SERVICES; LOSS OF USE, DATA, OR PROFITS; OR BUSINESS INTERRUPTION) HOWEVER CAUSED AND ON ANY THEORY OF LIABILITY, WHETHER IN CONTRACT, STRICT LIABILITY, OR TORT (INCLUDING NEGLIGENCE OR OTHERWISE) ARISING IN ANY WAY OUT OF THE USE OF THE RESOURCES, EVEN IF ADVISED OF THE POSSIBILITY OF SUCH DAMAGE.
HB reserves the right to make any enhancements, improvements, corrections or any other modifications to the RESOURCES or any products described in them at any time and without further notice. The RESOURCES are intended for skilled users with suitable levels of design knowledge. Users are solely responsible for their selection and use of the RESOURCES and any application of the products described in them. User agrees to indemnify and hold HB harmless against all liabilities, costs, damages or other losses arising out of their use of the RESOURCES.
HB grants users permission to use the RESOURCES solely in conjunction with the Hellbender products. All other use of the RESOURCES is prohibited. No license is granted to any other HB or other third party intellectual property rights.
HIGH RISK ACTIVITIES. Hellbender products are not designed, manufactured or intended for use in hazardous environments requiring fail safe performance, such as in the operation of nuclear facilities, aircraft navigation or communication systems, air traffic control, weapons systems or safety-critical applications (including life support systems and other medical devices), in which the failure of the products could lead directly to death, personal injury or severe physical or environmental damage ("High Risk Activities"). HB specifically disclaims any express or implied warranty of fitness for High Risk Activities and accepts no liability for use or inclusions of Hellbender products in High Risk Activities.
The information contained within this user guide, including but not limited to any product specification, is subject to change without notice. Hellbender Inc assumes no liability for any damages incurred directly or indirectly from any technical or typographical errors or omissions contained herein, or for discrepancies between the product and this guide.